Thursday, April 30, 2009

banana ice cream...

Photobucket


recently my girlfriend had to have surgery. so i wanted to make as many tasty things for her to eat as possible. this was at the top of the list for her as a must have comfort food. the entire batch was consumed within a few days. she can't stand watching alton brown - but she sure loves eating the food i make after i force her to :)

this ice cream is so good and so easy. there is no need to precook it to make a custard. you just throw the bananas and the ice cream maker bowl into the freezer overnight. the next day you mix everything into a food processor and then let the ice cream maker do all the work. you will thank me later...

Photobucket


banana ice cream...

6 ripe bananas
1 tablespoon fresh squeezed lemon juice
3/4 cup light corn syrup
1 vanilla bean, scraped or 1 tsp vanilla extract
1 1/2 cups heavy cream
mini chocolate chips about 1/2 a bag (optional)
chopped walnuts - about a cup (optional)


Photobucket


peel bananas and put on a cookie sheet. place bananas in freezer and freeze overnight. remove bananas from freezer and allow to thaw for 45 minutes to 1 hour. place in bowl of food processor along with the lemon juice and process for 10 to 15 seconds. add corn syrup and vanilla bean seeds and turn processor on. slowly pour in the heavy cream and process until smooth.

chill mixture in refrigerator until it reaches 40 degrees. then throw into an ice cream maker. stir in any extras like chocolate chips and walnuts. steal a few spoonfuls - then put the ice cream in an air tight container and let harden.

Photobucket

Monday, April 27, 2009

sausage and peppers...

Photobucket


so my girlie is jewish and loves herself some pork. bacon, pork chops, sausage, pork chops stuffed with sausage - don't worry - we will definitely post that one too. so one of our favorite quickie dinners is sausage and peppers...

this recipe is one i just have messed around with until i got the results i wanted. sausage with lots of peppers and onions in a chunky, thick tomato sauce. throw it all on a crusty roll with some fresh mozzie and you got a hell of a sandwich...

this is also really great for parties. make up a big tray of this and big tray of ziti - and you got enough food to feed 15 people. or like 8-10 italians. i am going to write the recipe with enough for about 4-6 people. half it for 2 people and have some tasty leftovers. double the recipe for a 9x13 tray...

Photobucket


sausage and peppers...

2 pounds good italian sweet sausage (with fennel if you can find it)
1 cup white or red wine
olive oil
1 large red onion
1 red bell pepper
1 yellow bell pepper
1 green bell pepper
3 cloves of garlic
1 can crushed tomato - 14oz
1 can whole peeled tomato - 28oz
basil
kosher salt
pepper
olive oil
red pepper flakes

nice crusty rolls or italian bread
a ball of fresh mozzarella cheese

cut the sausage into 2-3 inch pieces. put all the sausage in a frying pan over medium high heat. make sure to brown sausage on all sides to really get good flavor going on. you might need to do this in two batches...

while sausage is cooking start cutting up the veggies. slice the onions and peppers into strips. and throw into a bowl. mince the garlic...

once sausage is nice and crispy - add the wine to the pan. scrape all the little brown bits from the bottom of the pan and let this cook for a few minutes on medium heat. pour this all into a bowl and set aside...

Photobucket


add a tablespoon or 2 of olive oil to the pan. once it is hot add the garlic, onions and peppers. let them cook for 5 to 7 minutes to get all nice and cooked. then add the sausage and juices back to pan. cook for another minute to combine. then add crushed tomatoes to pan. open can of whole tomatoes and crush the tomatoes into the pan with your hands. it is always a good meal when your hands get dirty...

also add about a 1/2 cup of the tomato juice - discard the rest. season with salt, pepper and red pepper flakes for a little heat. let this cook over medium heat until sauce has thickened. add a handful of torn up basil leaves right before serving...

slice open your roll, pile on a big scoop of sausage and peppers. top with a slice or two of fresh mozzie. grab yourself a bib and go to town. no really, i am serious about the bib - you are gong to get this everywhere. but it is worth it...

Photobucket

(guess who wants some)

Saturday, April 25, 2009

lemon lime squares...

Photobucket


so my friend seth is having a birthday party tomorrow and i want to make him something tasty. his wife said he really likes citrus so i knew i had to bust out this recipe. i love these cookies. they are so light and fresh tasting. the mix of the lemon and the lime gives the cookies such great flavor. and they are really easy to make. bar cookies are really quick and feed a bunch of people. they were a hit at the party.

Photobucket


lemon & lime squares...


for the crust:
1 cup all-purpose flour
1/2 cup powdered sugar
2 tbsp grated lemon & lime zest
1 stick softened butter

for the filling:
4 eggs
1 cup sugar
1/4 cup freshly squeezed lemon juice
1/4 cup freshly squeezed lime juice
3 tbsp all-purpose flour
confectioners' sugar for dusting
1/4 to 1/2 cup sweetened shredded coconut (optional)

Photobucket


preheat the oven to 350...

make the crust:
in a medium bowl mix together the flour, sugar, and zest. cut in the butter to make a dough the consistency of coarse cornmeal. or make the dough in a food processor mixing the dry ingredients and then pulsing in the butter. press the dough evenly over the bottom of an ungreased 8-inch square dish. bake the crust for 15-20 minutes until it is just beginning to turn golden around the edges...

while the crust is baking make the filling:
in a large bowl beat the eggs, sugar, and lemon & lime juices until light, about 2 to 3 minutes. mix in the flour and beat just until combines. pour the filling over the hot baked crust. bake for 20 to 25 minutes until the filling is set. cool completely on a wire rack. cut into squares using a small sharp knife. sprinkle with powered sugar and sprinkle with coconut. yum...

Photobucket

Friday, April 24, 2009

seedlings for week 4...

Photobucket


so my squash are gigantic and leggy - the stems are getting pretty long. mental note - you don't need to plant squash seeds 6 weeks ahead. anyway they are going need to be re-potted pretty soon - either into another large pot or into the ground. but it might be too cold for that this soon...

Photobucket


my beans and pea plant are also really tall and are ready to be re-potted too. so i need to figure out what to do with them. i went and bought two long planters about 3 feet long and 6 inches deep. one for the peas and one for the purple green beans. and i replanted them and put one on either side of my balcony...


Photobucket

(evil doyle is protecting my peas...)

chicken and dumplings...

Photobucket


so remember how we made all that chicken stock last week and put it in the freezer for later. well this is why my friends - so you can make kick ass chicken and dumplings in about a half hour...

now i lived in texas for almost 4 years. and i was under the impression i would get around to learning to make all the tasty home cooking... alas - i didn't learn to make all the biscuits, and fried chicken and pecan pie that made me gain 30 pounds. so of course when i got home - i learned how to make chicken and dumplings my damn self...

the recipe i used is based on tyler florence's recipe on foodtv.com. it got great ratings from most of the people who used it. i have made from start to finish and is delicious. but as i found out - when trying to make the entire thing in one night - the whole process will takes close to 3 or 4 hours making for some very hungry dinner guests...

but no worries. we have previously made frozen chicken soupy goodness at our disposal. for the meat for the stew i just used a store bought roasted chicken. they usually have them in the deli section of most super markets for about $5. this is great because it cuts out a huge step...

Photobucket


chicken and dumplings...
(the quickie version)

2 tbsp butter
1 tbsp oil
1/2 cup diced carrot
1/2 cup diced celery
1/2 cup diced onion
3 cloves garlic - minced
2 bay leaves
1/4 cup flour
7 cups chicken stock (use your own frozen or really good store bought)
1/4 cup heavy cream
kosher salt and fresh ground pepper
several springs fresh thyme and rosemary

in a dutch oven or deep pot melt butter and heat oil over medium heat. add carrot, celery, onion, garlic, and bay leaves. saute about 5 minutes until the vegetables are soft. stir in the flour to make a roux. continue to stir and cook for 2 minutes to coat the flour and remove the starchy taste. slowly pour in the chicken stock stirring well to prevent clumps. let sauce simmer for about 15 minutes until it is thick enough to coat the back of a spoon....

while the stew is cooking - pull all the meat off the chicken and set aside. make the batter for the dumplings using the recipe below. carefully drop heaping tablespoonfuls of the dumpling batter into the hot mixture. the dumplings should cover the top of the sauce but should not be touching or crowded. then fold the reserved shredded chicken into the sauce. let the dumplings poach for 10 to 15 minutes until they are firm and puffy. chop up the fresh herbs and sprinkle into stew. season with freshly cracked black pepper...

dig in. then feel too full to leave the couch. awesome...

Monday, April 20, 2009

teaser for zucchini bread...

Photobucket


i love my friend mattyb... if only for the amazing tastyness of this zucchini bread. oh you have no idea. he pulled this out of his head one summer day when we were hanging out in my garden up in north hero. the boy has skills. it is so moist and damn good for breakfast with a cup of coffee...

i make this alot in the summer when i have a ton of zucchini from the garden. but i have been thinking about this since i planted my zucchini seeds. so i picked some up this week when it was on sale at price chopper...

sadly you are going have to wait and drool - because i am not going to post the recipe until i can coax matty to come and make this with me. seriously worth the wait...

Photobucket

Sunday, April 19, 2009

banana caramel cake...

Photobucket


guest blog - my mom-in-law - louann...

there is nothing i love more then baking with people. and my mother in law is visiting this week. so we have been cooking and baking up a storm. this is a recipe she picked out of the martha stewart baking book. all of martha's recipes are pretty intense with alot of steps. it is really long and i had to type it out by hand - i hope you appreciate it...

so louann did the whole project - every ridiculously long martha step. except for the caramel sauce - which i burnt twice. *sigh* so much for my candy making skillz.

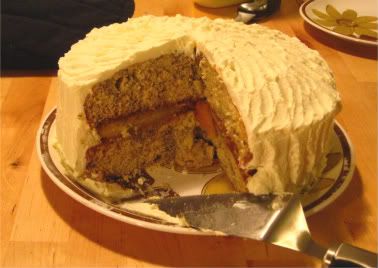
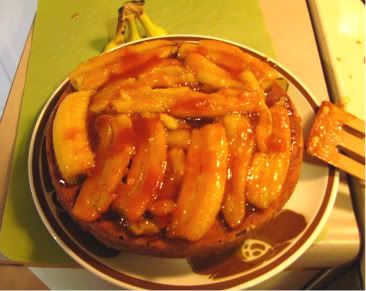
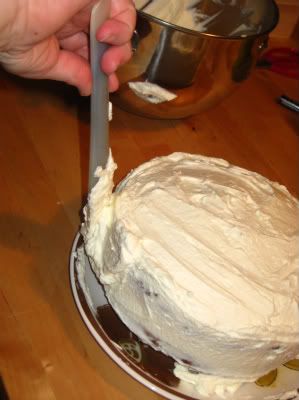
we had this delicious cake without the sauce. but it was still really good. especially the frosting. drool. the cake had really good flavor and the bananas in the middle were so tasty. we decide if we were to make this again we would throw a layer of frosting in the middle too...

Photobucket


banana caramel cake...

1 1/2 sticks, plus 3 tbsp butter, at room temperature
2 3/4 cups flour
1 1/2 tsp baking powder
1 tsp baking soda
1/2 tsp salt
3 very ripe bananas, mashed, plus 3 ripe bananas sliced lengthwise for filling
1/2 cup sour cream
1 tsp vanilla extract
1 2/3 cups plus 1/4 cup sugar
2 large eggs

mascarpone frosting (recipe follows)
caramel sauce (recipe follows)

Preheat oven to 350 degrees. Butter two 9 inch round baking pans, then dust with flour. Set aside. Into a medium bowl, sift together flour, baking powder, baking soda and salt. In a small bowl, stir together mashed bananas, sour cream and vanilla. Set aside.

Photobucket


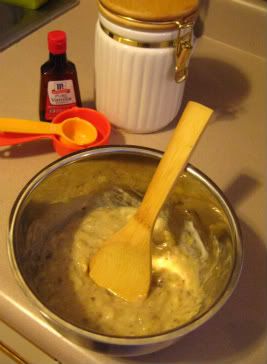
In the bowl of an electric mixer fitted with a paddle attachment, beat 1 1/2 sticks of butter and 1 2/3 cups sugar on medium-high speed until light and fluffy, app. 3-4 minutes, scraping down the sides of the bowl often. Add the eggs, one at a time, beating well after each addition. With the mixer on low speed, add the flour mixture in 2 parts, beating until combined after each, about 2-3 minutes. Using a rubber spatula, fold in the banana mixture, being careful not to overmix.

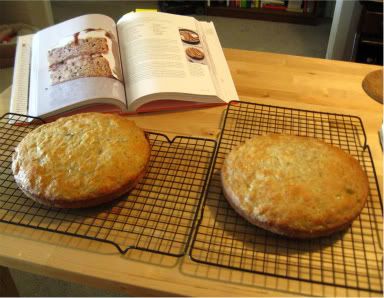
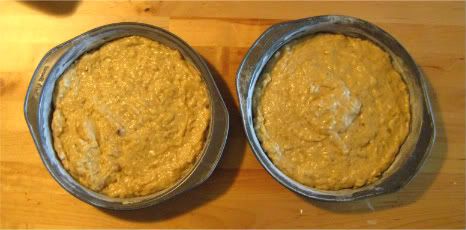
Divide the batter equally between the two prepared pans. Bake for 30-35 minutes. Cool on wire rack (in pans still) for about 20 minutes, or until the pans are cool to the touch. Invert pans onto racks and let cake cool completely outside of the pans.

Photobucket


Meanwhile, sprinkle remaining 1/4 cup of sugar into a large skillet. Cook over high heat, shaking the pan occasionally, until sugar is caramelized. Remove from heat. Stir in remaining 3 tbsp butter until melted. Return pan to heat. Add the sliced bananas, cooking until they start to brown. Gently turn bananas so that both sides are browned.

Place one cake layer on a cake plate. Arrange caramelized banana slices on top. Place remaining layer on top. Using a large spatula, spread Mascarpone Frosting over entire cake, swirling to completely cover. Drizzle Caramel Sauce over the top of the cake. Serve immediately, or refrigerate, covered for up to 3 days.

Photobucket


mascarpone frosting...

1 lb mascarpone cheese
1 1/4 cups heavy cream
1/2 cup confectioner's sugar

in the bowl of an electric mixer fitted with a paddle attachment - beat the mascarpone cheese, cream and confectioner's sugar until medium soft peaks form - 1 to 2 minutes. use immediately.

Photobucket


caramel sauce...

1/2 cup sugar
1/2 cup heavy cream

prepare an ice water bath. cook sugar in a medium saucepan over medium-low heat - until it starts to melt around the edges. shake pan to melt remaining sugar. continue to cook about 3 more minutes until sugar turns to an amber color. (this is where i burnt the caramel - twice - aim for two minutes if you are using an electric stove) remove from heat. stirring constantly - add cream in a slow steady stream. place caramel in a bowl in the ice bath and let stand until cool - stirring frequently.

Photobucket


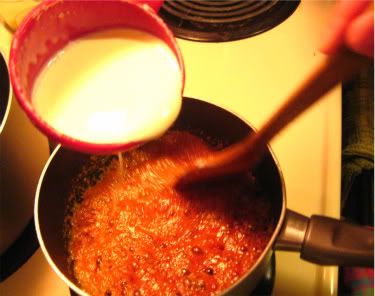
so on top of doing all the baking louann also took all of the pretty photos. everything turned out lovely even though my house still smells like burnt caramel...

Photobucket

Saturday, April 18, 2009

a little botanical maintenance...

Photobucket


so this weekend was so nice out we took the opportunity to repot some plants around the house and plant some of my seedlings...

Photobucket


alot of our house plants were in dire need of larger residences. we put a huge jade plant into a much larger container. we repotted a basil and a thyme plant i got at lowes into to little pots...

Photobucket


our big umbrella plant was put into a 16 inch square pot. we replanted a big rosemary plant i got at the winter farmer's market into a hanging basket...

Photobucket


and i planted all my snap pea seedlings into a long box planter because they were getting so big. i need to get another long planter for my green beans this week...

Photobucket


it was so nice and sunny today. it felt so good to get my hands in some dirt. i can't wait til it warms up enough start digging in my garden...

Photobucket

old fashioned strawberry ice cream...

Photobucket


i love ice cream. and i love my ice cream maker attachment for my kitchen aid. it fucking rocks. it was a christmas present from my sister because she understands that i am crazy and need to make ice cream at 11pm on a tuesday...

so price chopper had strawberries on sale and i picked up two pounds. and my mother in law is visiting. she had never made homemade ice cream before which is a shame because it is pretty easy to make and so damn tasty. so since we had all those nice strawberries laying around - i had to break it out...

Photobucket


this ice cream turned out so good. i liked using the half & half in place of the cream. some times when you use heavy cream - it can be a little too rich. this was a really creamy and flavorful...

you could throw any kind of berries in here. or probably any kind of fruit. next time i would add a little booze to the fruit to make it fancy. you could use a little chambord (a raspberry flavored liquor), or maybe a splash of schnapps if you want to make peach ice cream. be creative with it...

Photobucket


old-fashioned strawberry ice cream...

2 cups sliced strawberries
3/4 cup sugar
ice water
1 pint half&half
2 large egg yolks

in a medium glass or stainless steel bowl, combine strawberries and 1/4 cup sugar, mash with a fork. smash them up pretty small because you don't want big chunks in the ice cream. this is where i would have added a splash of chambord - booze goes well with everything my friends. set the bowl in a larger bowl filled with ice water...

in a medium saucepan, bring the half & half and remaining 1/2 cup sugar to a simmer - stirring occasionally over medium heat. in a heatproof bowl, whisk the egg yolks then gradually whisk in about 1/2 cup of the hot cream mixture. pour the mixture into a the sauce pan and cook whisking constantly over medium heat until steaming hot and frothy, about 3 minutes...

Photobucket


strain the custard into the bowl of strawberries. let stand whisking occasionally until cool (or throw in he freezer or fridge)...

toss the cooled custard in to your ice cream maker of choice. feel free to sneak a little spoonful at this point. or 2 or 5. then put ice cream into an airtight container to harden. serve in bowls or in a cone to be fancy...

quick note about ice cream makers --> i used a cheap-o walmart one i bought years and years ago. it was 10 dollars or something like that and it worked really well. also you can check out garage sales for old hand crank style ones. but summer is coming my friends and i truly believe you should try making your own ice cream...

Photobucket

Friday, April 17, 2009

my seedlings are huge...

Photobucket


well some of them anyway... it is week 3 since we planted the seeds... the got big pretty fast... the squash, pumpkins, green beans and snap peas have grown pretty large...

Photobucket


i am going to have to re-pot the green beans and the peas really soon... maybe this weekend... i wonder if it is warm enough outside to keep them alive...

Photobucket


toby is enjoying the nice weather...

Tuesday, April 14, 2009

chicken soup...

Photobucket


living in vermont - you eat a lot of soup. it is so cold here for so long you just crave warm filling soupy goodness. i love hot bowl of soup with a hunk of bread or a nice salad. there is nothing better. and the secret to making good soup is good stock. homemade chicken stock makes everything taste so much better.

i really like the idea of making soup. it is so cheap to cook up a big pot. it is made from a bunch of leftovers and bones and scraps. it is really such a simple way to stretch a bunch of food out longer. and it fills the house with the most amazing smell. it is incredible comforting.

i try to use as many leftovers for this as i can. i use the carcass of the chicken from the previous roasted chicken recipe. i also like to save veggie clippings by throwing them into a ziploc bag and then tossing the bag into the freezer. i save things like celery tops, potato peels, carrot tops, onions tops and skins, pieces of tomato and zucchini. anything that doesn't have too strong of a flavor - like broccoli or asparagus. when i am ready to make soup i can just add them to the pot along with the veggies.

Photobucket


chicken soup...

1 chicken carcass or one whole cut up chicken
2 onions
2 stalks celery
3 carrots - peeled
1 tomato
7 or 8 crushed garlic cloves
kosher salt
fresh cracked pepper
several sprigs of thyme
several springs of rosemary
several sprigs of flat left parsley
or handful of any other kind of herb you want to add

get yourself a big ass pot. seriously. take the leftover chicken and remove any giblets or lemon. put the chicken in the pot and scrape all the tasty seasonings and stuff from the bottom of the pan into the pot. if you are not using a left over chicken, just throw all the cut up chicken straight in there instead. fill the pot with water about 3/4 of the way.

add veggies, garlic, seasoning and any other junk you want to throw in there. this is pretty much up to you. i really like thyme & rosemary but season your soup with whatever you like.

so let all this come to a boil. you can throw a lid on this to make it go faster. then let the soup simmer uncovered for a few hours. drool at smell while waiting.

after the soup is done, you should let it cool. if it is winter just throw that big ass pot on the porch over night to chill. or toss it in the fridge for the night. you need to let the soup cool before you can strain it.

the next morning - scrape the hardened fat off the top of the soup and discard it. using a slotted soup - fish out the chicken and put it in a separate bowl. then scoop out the veggies and stuff and toss them.

strain the soup by using a fine mesh strainer or cheese cloth into another pot. or you can strain soup directly into tupperware containers to go into the freezer. discard all the leftover junk from the stock. then shred any leftover chicken and add if you like.

Photobucket


this freezes well. which is why you so much of it. this recipe will make alot of soup. several containers worth. so make it - toss in the freezer. and you will have enough soup to last you for a while. and you will thank me later.

Friday, April 10, 2009

chocolate covered marshmallows...

Photobucket


so first a warning... you will eat these until you become sick... and even with a stomach ache... you will contemplate eating yet another one... they are that good... so you should make some... hehehe...

originally the plan was to make homemade peeps from the homemade marshmallows... i tried rolling a few in the colored sugar and i wasn't impressed... so a suggestion was made by the girlie to dip them in chocolate... well... that was a damn fine suggestion...

i have made a few homemade marshmallow recipes at this point... this time i used alton brown's recipe...

this recipe rocks and it makes delicious, fluffy marshmallows... the texture is just right and using the powered sugar/cornstarch comb is great... make these... seriously...

Photobucket


marshmallows

3 packages unflavored gelatin
1 cup ice cold water - divided
1 1/2 cups sugar
1 cup light corn syrup
1/4 teaspoon kosher salt
1 teaspoon vanilla extract
1/4 cup powdered sugar
1/4 cup cornstarch
nonstick spray
2 bags chocolate chips for baking (or bars of chocolate)

place the gelatin into the bowl of a stand mixer along with 1/2 cup of the water. have the whisk attachment standing by.

(a little story. don't try to make marshmallows using a cheap-o hand mixer unless that is the last thing you want to make with it. apparently their motors like burn out at high speeds for 12 minutes - lame. anyway use a stand mixer to make marshmallows.)

Photobucket


in a small saucepan combine the remaining 1/2 cup water, granulated sugar, corn syrup and salt. place over medium high heat, cover and allow to cook for 3 to 4 minutes. uncover, clip a candy thermometer onto the side of the pan and continue to cook until the mixture reaches 240 degrees F, approximately 7 to 8 minutes. once the mixture reaches this temperature, immediately remove from the heat.

turn the mixer on low speed and, while running, slowly pour the sugar syrup down the side of the bowl into the gelatin mixture. once you have added all of the syrup, increase the speed to high. continue to whip until the mixture becomes very thick and is lukewarm, approximately 12 to 15 minutes. add the vanilla during the last minute of whipping. while the mixture is whipping prepare the pans as follows.

Photobucket


combine the confectioners' sugar and cornstarch in a small bowl. lightly spray a 13 by 9-inch baking pan with nonstick cooking spray. add the sugar and cornstarch mixture and move around to completely coat the bottom and sides of the pan. Return the remaining mixture to the bowl for later use.

when ready, pour the mixture into the prepared pan, using a lightly oiled spatula for spreading evenly into the pan. dust the top with enough of the remaining sugar and cornstarch mixture to lightly cover. reserve the rest for later. allow the marshmallows to sit uncovered for at least 4 hours and up to overnight.

Photobucket


turn the marshmallows out onto a cutting board and cut into 1-inch squares using a pizza wheel dusted with the confectioners' sugar mixture. this is the part where i used the cookie cutters. i was looking for little tiny ones. i ended up with one big bunny and one big duckie. cut the marshmallows one by one and then lightly dust all sides of each marshmallow with the remaining mixture, using additional if necessary. store in an airtight container for up to 3 weeks.

covering the marshmallows in chocolate was pretty simple but definitely messy. i just melted some hershey's chocolate chips. i don't have a double boiler so i faked one by using two saucepans - one slightly larger then the other. i filled the larger one about halfway with water and brought it to a boil. then i added the chocolate to the smaller pot and placed it in the water. lower the heat to medium then just stir the chocolate until it melts...

Photobucket


i know you can melt chocolate in the microwave but i always burn it. plus i like this method because you can occasionally put the chocolate back in the water if it starts to get thick. or add more chocolate if you need it. i liked using the chips cuz they melted fast. but you can of course use the bars.

anyway. just tap off some of the extra sugar and toss the marshmellow into the chocolate. flip it around to make sure that it is covered and then pick up with a fork. scrap extra chocolate off fork by dragging on edge of bowl. place marshmallow on a cookie sheet lined with wax paper. toss in fridge to harden.

so these tasted awesome. the chocolate coating did get a little melty if left out of the fridge too long. i think maybe next time i will try the chocolate melts from the candy store instead of straight chocolate for a harden coating.

but in the end... you don't care there is chocolate on your fingers... you are just sad that you hand is now empty...

Photobucket


so go grab another one...